Friday, February 17, 2012

Assignments/Tests - Students Not Getting Feedback?

If your students do not seem to be getting their feedback text or attachments, it may be because the faculty member placed the feedback/attachments in the "Grading Notes" area of the assignment or test. The comments and attachments added in this area are meant to be visible only by the instructor.

Follow these when returning feedback/attachments to a student's assignment or test submission:


1. Enter the course and go to the Full Grade Center.

2. Find the column of the assignment/test you wish to grade, and click the drop-down arrow at the very top of the column. Select Grade Attempts.

3. Once you are taken to the Assignment or Test area, scroll down.

Click Image to Enlarge

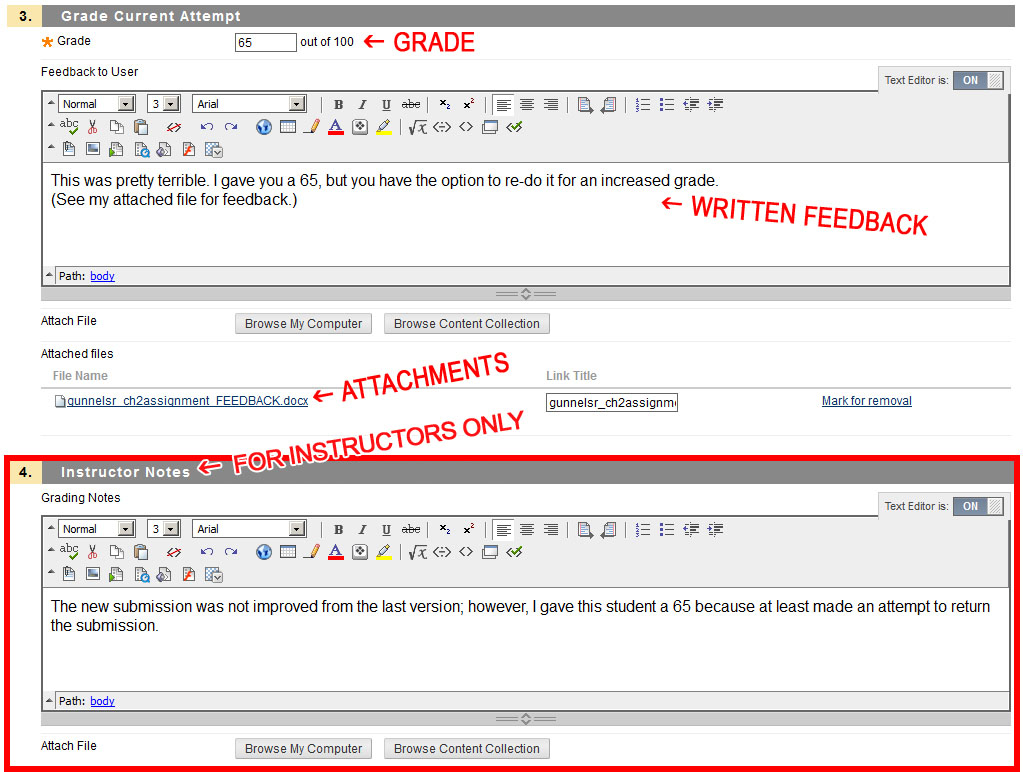
4. In scrolling down, you will find three sections:
       a. Grade - how many points a student achieved on the submission
       b. Feedback to User - text and attachments that students will be able to see
       c. Grading Notes - text and attachments meant ONLY for instructors to see

Students will only see your feedback and attachments if it is in the Feedback to User area.

Click image to enlarge


Please feel free to call UHD Blackboard Support at (713) 221-2786 if you have any questions about feedback or editing assignment/test attempts.


Friday, February 10, 2012

Announcement to Students

Dear Students,

If you are required to use Respondus Lockdown Browser for exams, we recommend that you uninstall any previously installed version and reinstall the latest version from the following link:


If you have questions or problems please contact user support at (713) 221-8031.

Regards,
Blackboard Support

Applying a Rubric to a Graded Discussion

Rubrics allow you to apply specific grading criteria on your students' work and provide detailed explanations regarding your grading decisions.  A rubric can be applied to an assignment, test or a discussion topic.  One would apply a rubric to a discussion forum so the threads can be easily graded. 

To apply an already-created rubric and apply it to a discussion forum, follow these steps: 

1. Go to the discussion board to which you wish to apply the rubric, and click its drop-down arrow. Select Edit.  

2. Scroll down to Section 3, Grade Settings.  Make the forum graded by selecting the radio button next to Grade Discussion Forum and choose the amount of points possible. 

3. When you click the aforementioned radio button, the Rubrics options will appear. Hover your mouse over the Add Rubric button to select an existing rubric or create a new one on the spot. 
 

4. The Grade Threads option also allows rubrics to be used, but the rubric must be applied via the Grade Center discussion column for the graded thread.  
           a. To choose this option, go to the Grade Center. 
           b. Find the column of the discussion and click its drop-down arrow.
           c. Select Edit Column Information add a rubric to the graded thread.
           d. Scroll down to where it says "Points Possible" and click the Add Rubric button.
          
           e. Click Select Rubric, choose the correct rubric and Submit.


Click here to watch a video about how to create a rubric.

If you have any questions,
contact Blackboard Support
at 713-221-2786.


Wednesday, February 8, 2012

Need to Know a Student’s Last Login?

There are many instances during which it is very useful to know when a student last logged into your course. Use Blackboard’s Early Warning System to determine this by following these steps:

1.    Enter your course. Make sure edit mode is turned ON.

2.    Scroll down to the control panel at bottom left; click Evaluation and select Early Warning System.


3.    On the Early Warning System page, click the Create Rule button, and select Last Access Rule.

4.    Name the rule “Attendance Rule” (or something of your choice).

5.    In the text field provided, decide at what amount of days you wish the rule to alert you of a student’s last access. For instance, entering “14” in the field will create a rule that checks to see which students haven’t logged in within the last 14 days.

Click Image to Enlarge


6.    Click the Submit button.

7.    On the Early Warning System page, you will see your new rule listed. To “activate” the rule, click its drop-down arrow, and select Refresh. Click OK on the dialog box that pops up.

8.    Now in the Number of Warnings column, you will see how many students were flagged by this rule.

9.    To view the flagged information, click its drop-down arrow and choose Review Rule Status.


10.    You will be taken to an area that displays last access information.

Click Image to Enlarge


Please note: the Early Warning System does not continuously monitor the course and must be refreshed on a regular basis by the instructor. To refresh the rule, complete step 7 above.

If you have any questions,
contact Blackboard Support
at 713-221-2786.


Review Status

Do you want confirmation that your students have reviewed specific course items, such as the syllabus? The Review Status tool allows instructors to track student usage and viewing of specific content items.

1. Click on the drop-down arrow to the right of your content item (in this example: Syllabus) and select Set Review Status (Disabled).


2. In the Review Status area, click the radio button for Enable. Then click Submit.


3. Your students will now see the “Mark Reviewed” button beside their syllabus (instructors can see what this looks like by simply turning edit mode OFF).


4. To check the status of student reviews, go to the Control Panel at bottom left, click Evaluation, and select Performance Dashboard. In this area, you will see students who have marked items as reviewed.

Click Image to Enlarge


If you have any questions,
contact Blackboard Support
at 713-221-2786.


Edit the Notifications Settings (Students)

Notifications for specific features can be delivered to your dashboard, email, or mobile devices.

1.    Log into Blackboard. At the top of the page, select My Places

2.    In the dialog box, under your profile picture area, click Edit Notification Settings.

3. Click Edit General Settings. Here, you can customize email and Due Date notifications for all courses and organizations.
       a. Individual Messages - allows an email to be sent for each notification
       b. Daily Email Digest - collects all notifications and sends a daily report


4. Once you have completed editing your General Settings, click Submit.

5. Under the Edit Individual Course Settings heading, you may make changes to the notification settings of a specific course.

6. Under the Bulk Edit Notification Settings heading, you may select the set of courses or organizations to update and change the notification settings for them in one step.

7.  Under the Edit Individual Organization Settings heading, you may make changes to the notification settings for organizations in which you are enrolled (for example, Blackboard Support Organization).


Click here to load a document offering more details about announcements and notifications.

If you have any questions,
contact Blackboard Support
at 713-221-2786.


Hide a Grade Column from Students

Do you have a column in your grade center that needs to be hidden from students?

1. From within your grade center, click on the drop-down arrow beside the column you wish to hide. Select Edit Column Information.


2. Inside the Edit Column window, go to section 3 - Options.  Select the No radio button for "Show this column to Students.”


3. Click the Submit button.


If you have any questions,
contact Blackboard Support
at 713-221-2786.


Filter Students in the Grade Center of a Combined Course

In the Grade Center, you may view students in individual classes of a combined course. To do this, you will need to create a Smart View.

1.    Go to the Full Grade Center.

2.    Click the Manage button and choose Smart Views.

3.    Click the Create Smart View button.

4.    Name the new smart view based on how you wish to label the first class. Description is optional.

5.    In section 2, select the radio button for User.

7.    Using a print-out of your roster (from e-Services), select each student in the first class. (You may use your CTRL key to continue selecting through the list).


8.    Click the Submit button.

9.    In the Smart Views area, place a green star beside your new smart view.


10.    Repeat all steps for your second class.

Now under the Grade Center in your control panel, you will see the smart view options you created!


If you have any questions,
contact Blackboard Support
at 713-221-2786.


Export and Import a Test

Need to move a test from one course to another?

Export the Test from a Course

1. Under your course control panel, click Course Tools, and select Tests, Surveys, and Pools.

2. In the Test, Surveys, and Pools window, click Tests.

3.  Click the action link to the right of the test you wish to copy and click Export to Local Computer.


4.  A zip file of your test is created that you can save to your local computer.


Import the Test into a Different Course

1.  To import a test, go to Tests, Surveys, and Pools, and click Tests.

2.  Click the Import Test button.


2.  Click the Browse My Computer button, select your test file, and click Open

3.  Click the Submit button. Your test will appear in the Tests, Surveys, and Pools area, ready to be deployed into a content area.


If you have any questions,
contact Blackboard Support
at 713-221-2786.


Delete Test Attempt

Need to delete a test attempt for a student?

1. Go to the Full Grade Center under the Course Management Control Panel.


2.  Hover your mouse pointer over the appropriate grade center entry for the test attempt you wish to clear. A drop-down arrow will appear; click it and select which attempt to wish to clear.


4.  In the attempt area, the Test Information section may be minimized; maximize it and click the Clear Attempt button.


5.  Confirm your attempt removal to complete removing the attempt.  The Grade Center should now show the attempt had been removed.


Set the Course Entry Point Page

In Blackboard Learn, you can select a particular section of the course that you would like students to see upon entering the course. This is also referred to as a “landing” page.

This is easily changed by following these steps:

1.    Under the Course Management menu, be sure the Control Panel is expanded.

2.    Click the Customization link to expand the customization options, then click Teaching Style.


3.    Section 2 allows you to select the course entry point. Please note: Only an area containing content will be available for selection.


4. Once the new entry point has been selected, click Submit.


Important Info About Adaptive Release

You can set adaptive release on almost any item in Blackboard; this is an availability criteria you can set by date, member, group or grade.  To set adaptive release on an item, follow these steps:

     1. Make sure edit mode is ON.
     2. Click the drop-down arrow next to an item in a content area, and click Adaptive Release.


     3. On the Adaptive Release page, there are three sections:

a.       Date – choose a date/time when the item appears (Display After) and disappears (Display Until)
b.      Membership – choose which individuals or groups can see this item
c.       Grade – decide what grade must be achieved on a test or assignment in order for this item to be visible
Typically you will only change one or two sections, such as date and membership.


     4. When you have chosen the adaptive release criteria for that item, click Submit.
     5. When you are returned to the content area, you will see the item has a notation: Enabled: Adaptive Release.

Please note that any settings that are active in adaptive release will supersede any other setting within the item, and it can actually hide content from students.


Click here to load a training document about setting adaptive release on a test.

If you have any questions,
contact Blackboard Support
at 713-221-2786.

Thursday, February 2, 2012

Missing Left Menu?

A frequent issue for Blackboard users is the left menu and links not being visible.

There are two types of arrow buttons (pictured below) that collapse the menu area, making it not visible.
  1. The double chevron at the top of the menu (in the gray area with the course title) collapses all of the menu links.
  2.  The light gray arrow button attached to the right side of the menu collapses the entire left menu area so that the menu is not visible at all. 
 If you are experiencing this issue, you can retrieve the menu links or entire left menu by clicking again on either the upper chevron or left-hand arrow.