Wednesday, December 19, 2012

Embedding HTML code into Blackboard

 Blackboard allows for the embedding of HTML code for web native applications. This post will cover how to embed a web application into Blackboard in a few steps. Starting from the home page here are the steps to embed an HTML application, for this example we will use Quizlet web app -a description and an example of quizlet is at the bottom of this blog-.
 
 
1. Assuming you have a content folder, click on Content. In the Content page, from the Build Content tab select Item. 

2 .In the Create Item page, make sure Text Editor is turned on. One of the options is Toggle HTML source, it is represented by two angle brackets (< >), click on it to toggle on HTML source.  


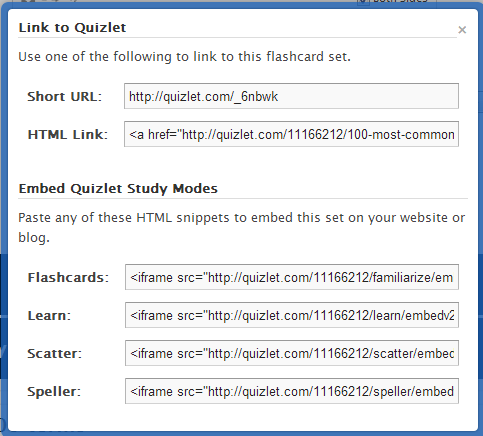
3. Click on the link (quizlet SAT words), this will open up a set of interactive flashcards. On the top-left corner under "Share this set" click on the option "Link or embed".
 

4. A small window will pop-up with several options. We want to embed the "Flashcards" html snippet. Highlight the HTML code, right click and copy (Ctrl + C) it. 

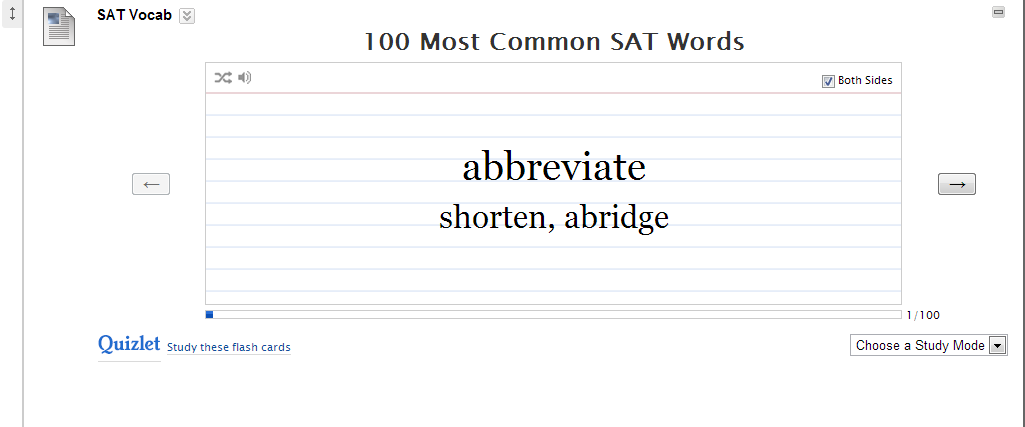
5. Switch back to the Create Item page, give the item a name (SAT Vocab); paste the HTML snippet that you copied into the text editor and click Submit.  

6. Congratulations, you have just embedded a piece of code into Blackboard that allows students to interact with an online web application.  


Quizlet.com is an online crowdsourced (a la Wikipedia) repository of Flashcards. The student or teacher fills out the blanks for each term and definition or it can be exported from a word document, or excel (.csv) file. The website has lots of features and it is free, the only exception is the uploading of images. This app is useful for classes with glossaries, technical vocabulary, and important dates to remember. One can have a static glossary and include a Flashcard mode for students to engage in active learning.
See Below for a demonstration:


Wednesday, November 14, 2012

How to Upload a Glossary

   For classes that deal with a lot of new vocabulary words, a Glossary is an essential tool. This guide will show the steps to upload a Glossary into Blackboard Learn.
For this guide, you can use the following exercise document to follow the steps:

Glossary Exercise File

1.   While in the home page, on the bottom left in the Blackboard Control Panel under Course Tools, click on Glossary.

 2.  The two options are Upload and Download Glossary, click on Upload Glossary.


3. In this new page, click on the Browse my Computer button, the two accepted files formats for creating a glossary are text files (.txt) and comma delimited (.csv). For this example the file is comma delimited (.csv).
4.  Select the Glossary file and Click Open

5. Once the file is attached, in section 2 you can choose to add terms in this file to those already in the Glossary, or to completely replace the previous terms with the brand file. Once that is done click Submit. 
6. The Glossary will now show the terms and definitions and can be viewed by all users. Users can also jump to the letter of their choice at the top left corner.

Monday, October 29, 2012

How to Upload a YouTube Video into Blackboard in 6 Steps

YouTube is no longer just for cat and skateboard videos. And now Blackboard gives the option to add multimedia content -in this case video- into a course, thus allowing greater variety of information for the student’s benefit.

1. Starting from the Course’s Home page, select a content area in which you want to include the YouTube videos. For this example, the video will be placed under the content area called Content.


2. Once inside the Content Module, hover over the Build Content tab; under Mashups, select YouTube Video.


3. In the new page, type in the name of the YouTube video copy and paste the title into the Search Bar. Click on Go and all the videos within that parameter will show up. Click the Select button in the correct video.


4. After pressing Select, a new window will appear that includes various options for your video. First, the Name – this allows the video to be retitled to something else. The description box allows for additional information.


5.  Decide whether to show the YouTube url address or YouTube information. Additional content can be attached to the YouTube video, for example: an assignment, a questionnaire, notes, etc. The last three options include setting the release date of the video, track the number of views, and set a limit to the duration it is made available. Click Submit when you have finished selecting your options.


6. After clicking Submit, the Content page will load and display the YouTube video ready to be viewed by students.


For more information on mashups in Blackboard please visit:
YouTube - http://www.uhd.edu/computing/ttlc/training/documents/bblearn/Mashups_Youtube.pdf

Contact UHD Blackboard Support at 713-221-2786 if you have any questions.

Thursday, October 4, 2012

Deleting a test question and regrading

You can delete questions from the Test Canvas before or after a test is deployed. You can also delete a question if there are test submissions, which removes it from the test, along with any possible points earned. Test attempts are regraded as if the question was not included in the test.

NOTE: If any students are in the process of taking a test, you will not be able to delete questions until they have submitted their work and the test is no longer in progress.


  1. In the Grade Center, click a test’s Action Link in the column header to access the contextual menu. Select Edit Test
  2. On the Test Canvas, select one or more questions to delete using the question check boxes. 


  3. Click Delete and Regrade.


  4. A warning message will pop up for you to confirm your choice. Click OK to confirm.

  5. A green success message should appear above the test canvas and the total questions and points should be updated. 


For more information on grading tests in Blackboard, please visit:
http://www.uhd.edu/computing/ttlc/training/documents/bblearn/Assessments_Grading.pdf.

Contact UHD Blackboard Support at 713-221-2786 if you have any questions.


Changing correct answers and regrading tests

You can edit questions from the Test Canvas at any time. After students have submitted test attempts, you can edit the wording of a question or answer, or reorder questions without affecting existing grades. Changing the correct answer choice of a question causes all existing test attempts to be regraded.
  1. In the Grade Center, click a test’s Action Link in the column header to access the contextual menu. Select Edit Test.

  2. On the Test Canvas, click the Action Link of the question you want to edit. Select Edit.

  3. In this example we are going to change the correct answer from “D” to “A”.  In Section 3, Answers, click the appropriate radio button to change the correct answer.  

  4. Click Submit and Update Attempts in Section 7 to save your changes. 

  5. A warning message will pop up for you to confirm your choice. Click OK to confirm.

  6. A green success message should appear above the test canvas and the total questions and points should be updated.


For more information on grading tests in Blackboard, please visit:
http://www.uhd.edu/computing/ttlc/training/documents/bblearn/Assessments_Grading.pdf.

Contact UHD Blackboard Support at 713-221-2786 if you have any questions.

Wednesday, October 3, 2012

Viewing Statistics on an Individual Course Item

Do you have tracking enabled on items in your course but need to know how to view the statistics?  Follow these easy steps:

  1. Go to the item that has Statistics Tracking enabled and click the action link (drop down—double arrows) beside the item and select View Statistics Report.

  2. In the Course Reports window that comes up, click the action link (drop down—double arrows) beside the item Content Usage Statistics item and select Run.


  3. In the run reports window you can select the format, start and end dates, and the users you want to include.  Click Submit when finished.


    For more information on Blackboard, visit the UHD IT Training page for faculty found at:
    http://www.uhd.edu/computing/ttlc/training/#fragment-2.

    Contact UHD Blackboard Support at 713-221-2786 if you have any questions. 

Monday, September 10, 2012

Reducing an Image’s Size Dimensions

Large images in your Blackboard course can be easily reduced in size by customizing the dimensions.  In particular, pictures that were taken with a digital camera may display much larger than desired.  Use the steps below to resize your images.
Any image added using Build Content > Image can be resized.

  1. Click the drop menu for the image and select Edit.
  2. Locate the Dimensions setting and change the setting to Custom.  The numbers here are the images size in pixels.  Pixels are quite small, but when they start to number in the thousands they add up to images quite large! 


The dimensions can be reduced, but they need to be adjusted by the same proportion so that image is not stretched in any way.  In this example, both numbers were divided by eight.


Now click Submit and view your resized image!
.

Friday, September 7, 2012

Moving vs. Copying Course Content

In Blackboard Learn you have the option to copy and/or move content files and folders to different areas of your course or even to another course.  The copy feature allows you to duplicate a content item and place it in another course or content area, while the move feature removes a content item and places it in another location.

To Copy a Content Item

  1. Make certain Edit Mode is ON

  2. Navigate to the content area that contains the material you want to copy. (In this example we will copy a single file called Syllabus).

  3. Click the action link for the item you want to copy, and then click Copy.

  4. On the Copy page, in section 2 Destination, select the Destination course you want to copy the item to. Click the Browse button in the Destination Folder area to select the folder you wish to move the item into.

  5. In the Select Location pop-up window, select the folder into which you will place your copied item.

  6. In section 3, Attachments and Embedded Links, the second item (Include links and make copies of attached and embedded files) should be selected. When you are finished, click Submit in section 4.
Please note: Items that are tied to the Grade Center such as Assignments, Tests, and Surveys cannot be copied from a content area directly. These items must be copied using the Course Copy feature.

To Move a Content Item
  1. Make certain Edit Mode is ON.

  2. Navigate to the content area that contains the material you want to move. (In this example we will move a content folder called Folder)

  3. Click the action link for the item you want to copy, and then click Move.

  4. On the Move page, in section 2 Destination, select the Destination course you want to copy the item to. Click the Browse button in the Destination Folder area to select the folder you wish to move the item into.

  5. In the Select Location pop-up window, select the folder into which you will move your item.

  6. When you are finished, click Submit in section 3.


 For more information on Blackboard content, visit the Content section of:
http://www.uhd.edu/computing/ttlc/training/#fragment-2.

Contact UHD Blackboard Support at 713-221-2786 if you have any questions.