If you have ever tried proofreading your own writing, you know
that it is almost impossible to catch every mistake. This is mostly because
your brain already knows what you are trying to say. What your eyes read on the
page and what you see in your head are not always the same. Here is a quick way
of preventing most “invisible typos”: Use the Speak command on Microsoft Word. Preventing these typos help
improve both quality and presentation. The Speak Button can also be beneficial
when reviewing what you have written. As the instructor, it can be difficult to
assess if the assignment instructions are confusing. Have the Speak
command read the instructions aloud and decide if they are clear and
concise.
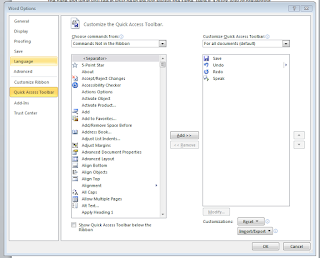
Add the Speak
command to your Word Quick Access Toolbar by following these instructions:
1. Go to File and select "Options".
2. Click on the Quick Access Toolbar. On the dropdown menu select "Commands not in the Ribbon".
4. You will now have Save, Undo, Redo, and Speak in the Quick Access Toolbar.
The Speak Button will now be available in every document, new or old. Whenever you are done writing, highlight the most recent passage or the entire document and click Speak. The text will be read aloud and you can listen closely and note any typos, grammatical errors, etc.
To get rid of the Speak button, follow steps 1 and 2, click Remove from Quick Access Toolbar and click Ok.
Note: The Speak command is not a replacement for a fresh pair of eyes or a proofreader, but if you want to revise your work before asking someone else it definitely helps.


No comments:
Post a Comment