Showing posts with label Grade Center. Show all posts

Wednesday, October 30, 2013

Getting Blackboard Survey Results

After a survey has been given, the results can be viewed from the Grade Center.  Find the survey's column and from the drop menu, select Attempts Statistics.


The statistics will show the percentage of survey takers that selected each available response. Results are always anonymous, though you can see whether a particular person took the survey or not from the grade center column.


For further help, contact us at 713-221-2786, bb@uhd.edu


Monday, September 9, 2013

Attendance: Check Users' Last Course Access in Blackboard


The Last Access column, which is included by default in the grade center, contains the date of the last course access for each user. 

Check the last course access:
1. Under the Course Management area select Grade Center, Full Grade Center.
The last access column is located with the other default columns in Blackboard 
(Last Name, First Name, Student ID, Last Access, and Availability).

 If this column is not visible it could be hidden and can be added by showing the column.

Show hidden columns:
1. Under the Course Management area select Grade Center, Full Grade Center.

2. Move the cursor over the Manage button and select Column Organization. 

3. The default columns are displayed at the top of the page and will be marked hidden if they are not visible in the full grade center.

4. Select the check box and move the cursor over the the Show/Hide button.  Click show selected columns. 

5. Select Submit to save.

Wednesday, July 17, 2013

Weighted Columns: Equally vs Proportionally


Grades can be weighted both equally and proportionally in Blackboard depending on the point values of each grade center column.  Using the Weighted Total Column will allow application of weighted percentages (rather than a summed total of points which is the Total Column’s function).  Both Total and Weighted Total columns are available in the Grade Center by default.

Weighted Total Column- A Weighted Column calculates and displays a grade based on selected assessments, or categories of grades, to calculate the total grade.
Instructions for creating a weighted column are below:
Weighted Grade Column
The following displays the workflow for creating a Weighted Grade Column based on four (4) columns:

  • Mid-term Exam = 20%
  • Final Exam = 30%
  • Assignments Category = 25%
  • Quizzes Category = 25%


To create the Weighted Grade Column, do the following:


  1. Move the cursor over the Create Calculated Column icon in the Action Bar of the Grade Center.
  2. Select Weighted Column
  3. Enter a Column Name.
  4. Enter a Grade Center Display Name.
  5. Enter a Description.
  6. Select Primary Display and Secondary Display options from the drop-down menus available.
  7. Select the items to be included in the Weighted Grade Column, and enter the percentages for each Column or Category to be included in the Weighted Grade.


Columns to Select – A list of all columns in the Grade Center. Select the Column and click the arrow to add it to the Weighted Grade column.

*Categories to Select – A list of all Categories in the Grade Center. Select the category and click the arrow to add it to the Weighted Grade column.

*With a weighted total column Blackboard assumes equal points per assignment unless you specify otherwise.  You have to specify proportional if the total available points is different for each assignment.


If you’re weighting by category AND you have different points associated with different assignments within the same category you should weight proportionally.  Blackboard will calculate the weighted total by dividing by the total points available and not assume each assignment is worth the same amount of points.  OR you could make all of your assignments worth 100 points and keep it at equally.


Thursday, October 4, 2012

Deleting a test question and regrading

You can delete questions from the Test Canvas before or after a test is deployed. You can also delete a question if there are test submissions, which removes it from the test, along with any possible points earned. Test attempts are regraded as if the question was not included in the test.

NOTE: If any students are in the process of taking a test, you will not be able to delete questions until they have submitted their work and the test is no longer in progress.


  1. In the Grade Center, click a test’s Action Link in the column header to access the contextual menu. Select Edit Test
  2. On the Test Canvas, select one or more questions to delete using the question check boxes. 


  3. Click Delete and Regrade.


  4. A warning message will pop up for you to confirm your choice. Click OK to confirm.

  5. A green success message should appear above the test canvas and the total questions and points should be updated. 


For more information on grading tests in Blackboard, please visit:
http://www.uhd.edu/computing/ttlc/training/documents/bblearn/Assessments_Grading.pdf.

Contact UHD Blackboard Support at 713-221-2786 if you have any questions.


Changing correct answers and regrading tests

You can edit questions from the Test Canvas at any time. After students have submitted test attempts, you can edit the wording of a question or answer, or reorder questions without affecting existing grades. Changing the correct answer choice of a question causes all existing test attempts to be regraded.
  1. In the Grade Center, click a test’s Action Link in the column header to access the contextual menu. Select Edit Test.

  2. On the Test Canvas, click the Action Link of the question you want to edit. Select Edit.

  3. In this example we are going to change the correct answer from “D” to “A”.  In Section 3, Answers, click the appropriate radio button to change the correct answer.  

  4. Click Submit and Update Attempts in Section 7 to save your changes. 

  5. A warning message will pop up for you to confirm your choice. Click OK to confirm.

  6. A green success message should appear above the test canvas and the total questions and points should be updated.


For more information on grading tests in Blackboard, please visit:
http://www.uhd.edu/computing/ttlc/training/documents/bblearn/Assessments_Grading.pdf.

Contact UHD Blackboard Support at 713-221-2786 if you have any questions.

Thursday, August 2, 2012

Student View

Do you want to see and interact with your course as your students do? Blackboard has a built-in sample student in the Grade Center of your course to help you calculate your semester grades, practice grading, and taking assignments/exams.

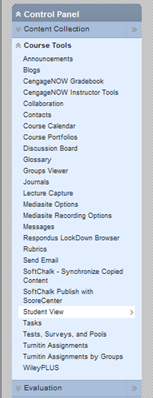
Go to the Control Panel menu at bottom left, and click Course Tools. Among the options that expand, select Student View.

Student View allows you to view whether or not tests are available, what the My Grades tool looks like from the student perspective, and other course functions students use.


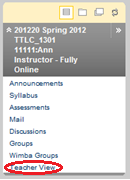
In Student View, the instructor's Control Panel menu is gone; it has been replaced by a single link at the bottom of the Course Menu called Teacher View.  If you click Teacher View, you leave the simulated student view to resume instructor use of Blackboard. 

 
Note: You must return to Teacher View after using the Student View function, or your Blackboard session will remain in Student View and you will be unable to access other courses.

Once you have returned to Teacher View, the student Demo User has been activated in the Grade Center.  This additional student allows you to become more familiar with the Grade Center, grading, and formulas without disturbing actual student grades.


If you would like to add the Demo User to a course group, follow the instructions found on a previous blog entry - http://uhdttlc.blogspot.com/2012/06/adding-demo-student-to-group.html

Contact UHD Blackboard Support at 713-221-2786 if you have any questions.  


Wednesday, July 25, 2012

Submitting "In Progress" Test Attempts

Do your students have "In Progress" test attempts that need to be submitted? Follow the directions below to submit test attempts for your students:

  1. Enter the course Grade Center from the Control Panel menu.


  2. Click the action link (double arrow) to the right of the In Progress attempt and select the Attempt.

  3. In the Grade Test window, expand the Test Information section. Click the Submit Attempt button.

  4. In the dialog box that appears, click OK.


  5. The test should now have a score in the Test Information section.

For more information on grading tests in Blackboard, please visit
http://www.uhd.edu/computing/ttlc/training/documents/bblearn/Assessments_Grading.pdf


Contact UHD Blackboard Support at 713-221-2786 if you have any questions.

Wednesday, May 2, 2012

Too many rows in your grade center?

Do you wish you could hide Grade Center rows so that you can show grades to only one student? Are you tired of seeing unavailable students in your Grade Center? 


Setting the Row Visibility in your Grade Center is the answer!

1.  To change row visibility, select Full Grade Center from the Control Panel.


2.  Click the Manage button at the top and select Row Visibility from the drop-down list.


3.  A list of Grade Center rows comprised of student names will appear.  Select the check box beside the rows you wish to hide, and click the Hide Rows button.


Please note that unavailable students are designated with a circle-backslash icon.

4.  After you click Hide Rows, the rows you have selected will become italicized.  Click the Submit button.


Please contact UHD Blackboard Support at 713-221-2786 if you have any questions.

Thursday, March 22, 2012

Need a custom Grade Center view? Use Smart Views!

Untitled Document

Smart Views allow instructors to view their Grade Center using predefined filters.  All courses automatically have two Smart Views already: Assignments and Tests. 


Additional Smart Views can be built that quickly provide needed information to instructors.
Besides Assignments and Tests, there are several other prebuilt Smart Views readily available that can also be added to the Control Panel for easy access.  To view the Smart Views, mouse over Manage and click the Smart View link.
To make a permanent link in the Control Panel for a particular Smart View, click the star in the Add as Favorite column to turn it green.  If students have graded Discussions posts, then Discussion Boards can be selected in order to only show those scores.  Another available Smart View is Preview of My Grades, which will only show the columns visible to students in My Grades.

To access smart views, go to the Full Grade Center.  Inside the Full Grade Center, click the Manage button at the top and select Smart Views from the drop down list.


In the Smart Views window, Smart Views deployed in the course have a green star in the "Add as Favorite" column.  Smart Views that are available but have not been deployed have a grey star.


Creating a Custom Smart View
Smart Views can also be customized to show the data that you specify.  For this example, a Smart View will be built to identify the students that we classify as “struggling” based on their grades in specific columns.
  1. Click Create Smart View.  Name the Smart View “Struggling.”  A description can be provided if desired.  Click the Add as Favorite checkbox.
  2. Change the Type of View to Custom.

    The students that need to be identified have scored less than 70 on both Quiz 1 and the Midterm.  In the Select Criteria area, one criteria requirement is provided already, which can be used for Quiz 1.  Use the Add User Criteria to add another requirement for Midterm.


  3. Since both criteria need to be true, there is no need to change the formula from “1 AND 2” so do not click Manually Edit.  Filter Results can be used to show additional columns; for this example keep the default Columns Used in Criteria.      
        
  4. Click Submit.
Results for “Struggling” will look like this:


Monday, March 5, 2012

Set Grades as Running Totals

Making any calculated column set as "running total" will give students a more accurate grade because it includes only the assignments/quizzes that have been graded. If you were not to have this Running Total column available, the final grade column will calculate zeroes for columns that have not yet been graded. This can make grades appear artificially low.

In the Grade Center, you can create Calculated Columns, which can be used to do the following:

  • Calculate the total points of other columns.
  • Weight grades by column, category, or both.
  • Calculate the average grade.
  • Calculate a minimum or maximum grade.

Make a Calculated Column Set as a Running Total
1. At the bottom left in the control panel, click Grade Center and select Full Grade Center.

2. Either create a new calculated column by clicking the Create Calculated Column button, or click the drop-down arrow of an already present calculated column and select Edit Column Information.

3. Scroll down to the Select Columns section, and select the Yes radio button next to Calculate as Running Total.
Click image to enlarge


5. Scroll down and click the Submit button.


Wednesday, February 8, 2012

Hide a Grade Column from Students

Do you have a column in your grade center that needs to be hidden from students?

1. From within your grade center, click on the drop-down arrow beside the column you wish to hide. Select Edit Column Information.


2. Inside the Edit Column window, go to section 3 - Options.  Select the No radio button for "Show this column to Students.”


3. Click the Submit button.


If you have any questions,
contact Blackboard Support
at 713-221-2786.


Filter Students in the Grade Center of a Combined Course

In the Grade Center, you may view students in individual classes of a combined course. To do this, you will need to create a Smart View.

1.    Go to the Full Grade Center.

2.    Click the Manage button and choose Smart Views.

3.    Click the Create Smart View button.

4.    Name the new smart view based on how you wish to label the first class. Description is optional.

5.    In section 2, select the radio button for User.

7.    Using a print-out of your roster (from e-Services), select each student in the first class. (You may use your CTRL key to continue selecting through the list).


8.    Click the Submit button.

9.    In the Smart Views area, place a green star beside your new smart view.


10.    Repeat all steps for your second class.

Now under the Grade Center in your control panel, you will see the smart view options you created!


If you have any questions,
contact Blackboard Support
at 713-221-2786.