Showing posts with label Managing Content. Show all posts

Thursday, April 10, 2014

Adding Multiple Files at the Same Time using Items


Adding Multiple Files at the Same Time using Items
Use this method to simultaneously add multiple files, without having to create each link one-by-one. All files will be associated with one Item, as shown below.
finished.gif
First Step: Add Files to Content Collection
Files must first be placed in the Content Collection before they can collectively be added to an Item. The easiest way to upload several files to the Content Collection is to first package them – the WinZip program is available on campus and can be used to package files. With WinZip, you can select several files, right-click, and then select WinZip > Add to Zip File, and then all of the selected files will then be packaged into one file.
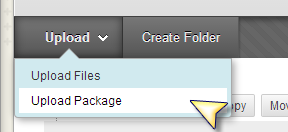
Use the Upload Package option to bring the files to the Content Collection.
up_pckge.png
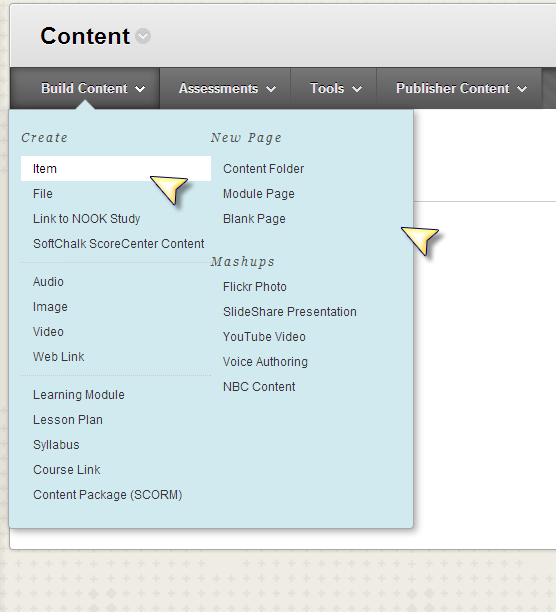
Second Step: Creating the Item and Adding the Files
From any content area, click Build Content and select Item from the list.
item.png
An Item allows for multiple attachments to be simultaneously added, but the attached files must come from Content Collection. You cannot select multiple files if you attach files from your local computer.
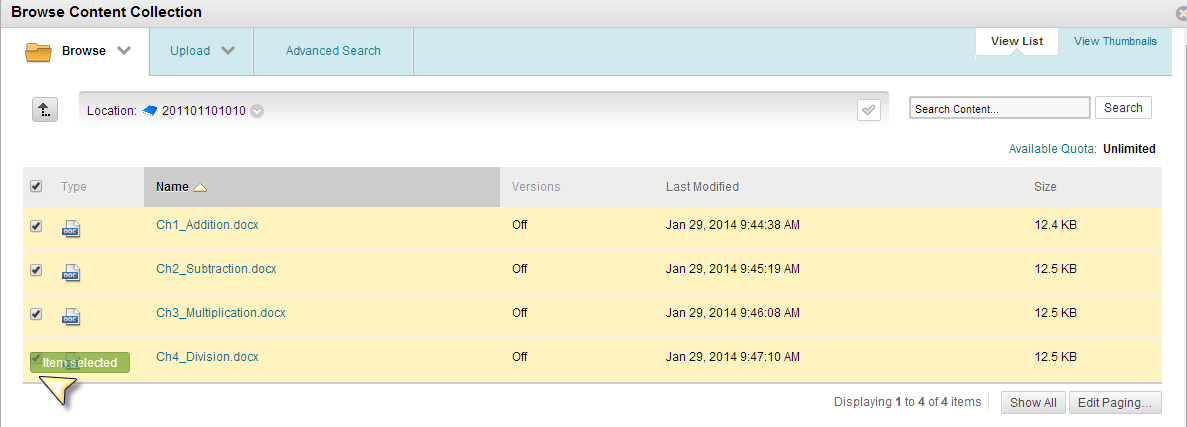
In Section 2 “Attachments” click the Browse Content Collection button. 
 attach.png
Use the checkboxes to select multiple files. Click Submit afterwards.
multiple.png
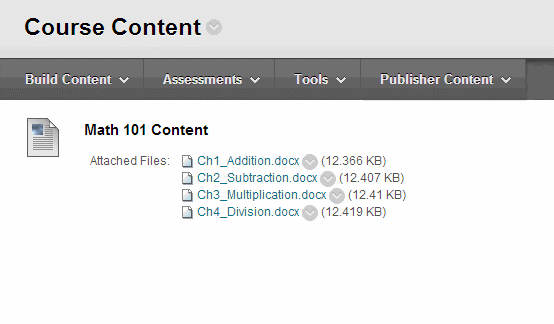
The attachments will all be listed. Click Submit again to create the item. Blackboard automatically arranges the files, alphabetically by title, however if you edit an existing item and add more files, the additional files will always appear after the first set of files.
finished.gif

Thursday, October 17, 2013

Embedding a Prezi Presentation into Blackboard Course Content

    1.   Log in to Blackboard.

    2.       Enter the course where you want to add your Prezi slide presentation.

    3.      Make sure to turn edit mode ON at the top.


       4.      Go to your course menu and select a Content area

    5.      On the open content page click the Build Content button, and then select Item.


    6.  In the open Item window, fill in a name for the Prezi presentation; add an explanation to the text box, if needed, then click the HTML Code View option.


     7. Go to your Prezi site (http://www.prezi.com) login to your Prezi account. Select the Prezi you want to embed into your course, click the Embed button and copy the embed code.


8.   Return to the open HTML Code View and paste the Embed code into the HTML Code View window.  

       
 9.      Click the Update button to close the HTML Code View screen and your Prezi will be embedded into the Content Item window. 

         
10.  Your embedded Prezi slide presentation is posted into your course content.


Friday, August 9, 2013

Things to Consider when Developing your Course Menu

Do you strive for order and consistency in your online courses? If so, you’ll want to be aware of the different ways to organize your course menu in SP11. Although you’ll use a desktop or laptop to develop your course, more and more of your students will be viewing that content on a handset or tablet via the Blackboard Mobile Learn app. Check out the free app for your Android or iOS device to test the differences across traditional and mobile platforms.
  •  Menu items include Content Areas, Tool Links, Subheaders, and Dividers (among other things)
  • All items can be added to your menu by clicking the Add Menu Item button 
  • Menu items can be deleted, shown/hidden, or renamed by clicking the action link to the right of the item 
  • Check out this Course Menu link for more helpful tips!


Thursday, February 21, 2013

Add Banner Image to Your Class


In continuing with the topic of customization, buttons are not the only thing that can be changed about your class.

Click on Customization.


1. Click on Teaching Style. It will open a list of options, scroll down to section 6 to upload banner.


2.  Click on Browse My Computer to find the image you want to upload. The recommended measurement for a banner is: 1000 px X 200-250 px.

3. Once you find the image, select the image and click open. The file will be attached. You can click Do not attach, if you clicked the wrong file.


4. When you have selected the right file and it has been attached to Blackboard. Scroll down to section 7 and click submit.

5. After clicking submit, you will be taken to the customization tab. It show a message in green saying: "Success: Course Style updated."
6. Go to the homepage to see the new banner that your students will see when they visit your course.

Note: Make sure to use an image that will meet the recommended measurements.


Thursday, February 7, 2013

Print an Exam using Respondus

If you have a test on Blackboard you would like to administer face to face rather than online, the web browser's print feature is not enough. One alternative is Respondus Campus Wide. Respondus Campus Wide allows you to download the tests as a word document and print it out.

To begin open Respondus Campus Wide (RCW); if you do not have RCW installed and would like to use it. Contact the TTLC: 713-221-8200

1. Once you open Respondus go to Retrieval & Reports Tab. Within the Tab, click on Retrieve Questions.
2. You should have the Blackboard Server information already filled out. Click Next, depending on your settings you might be asked to fill out your Blackboard Username and Password.


3. Once logged in, in section 1, use the dropdown menu to select the course to retrieve from.
    a. In section 2, select whether it is an exam, survey, or pool. In this example, select Exam and use the dropdown menu to choose which exam to download.
    b. In section 3, enter a new name for the file.

4. The exam will download and your file saved. Click Ok then Finish.


5. Now click on the Preview and Publish Tab.
    a. Select Print Options
    b. Save to File as a Word Document
    c. Once it is saved, open the Word Document and print from Microsoft Word.


Wednesday, December 19, 2012

Embedding HTML code into Blackboard

 Blackboard allows for the embedding of HTML code for web native applications. This post will cover how to embed a web application into Blackboard in a few steps. Starting from the home page here are the steps to embed an HTML application, for this example we will use Quizlet web app -a description and an example of quizlet is at the bottom of this blog-.
 
 
1. Assuming you have a content folder, click on Content. In the Content page, from the Build Content tab select Item. 

2 .In the Create Item page, make sure Text Editor is turned on. One of the options is Toggle HTML source, it is represented by two angle brackets (< >), click on it to toggle on HTML source.  


3. Click on the link (quizlet SAT words), this will open up a set of interactive flashcards. On the top-left corner under "Share this set" click on the option "Link or embed".
 

4. A small window will pop-up with several options. We want to embed the "Flashcards" html snippet. Highlight the HTML code, right click and copy (Ctrl + C) it. 

5. Switch back to the Create Item page, give the item a name (SAT Vocab); paste the HTML snippet that you copied into the text editor and click Submit.  

6. Congratulations, you have just embedded a piece of code into Blackboard that allows students to interact with an online web application.  


Quizlet.com is an online crowdsourced (a la Wikipedia) repository of Flashcards. The student or teacher fills out the blanks for each term and definition or it can be exported from a word document, or excel (.csv) file. The website has lots of features and it is free, the only exception is the uploading of images. This app is useful for classes with glossaries, technical vocabulary, and important dates to remember. One can have a static glossary and include a Flashcard mode for students to engage in active learning.
See Below for a demonstration: