UPDATE: Follow the instructions on this video as a work around for the current issue with youtube and powerpoint.
Thursday, March 21, 2013
Powerpoint and Youtube Compatibility Issue
UPDATE: Follow the instructions on this video as a work around for the current issue with youtube and powerpoint.

Slideshare Presentations
The current Mashup tool for inserting Slideshare Presentations is having API issues, so it is non-responsive. But this does not mean that you can no longer insert Slideshare presentations into your class. Here are six steps on how to insert a Slideshare Presentation into Blackboard.
1. Create an item

2. Turn on HTML editor

3. Visit Slideshare; find the presentation you would like to use.

4. Click on embed and click copy.

5. Switch back to Blackboard Learn; paste the HTML code into the text field, click Submit.

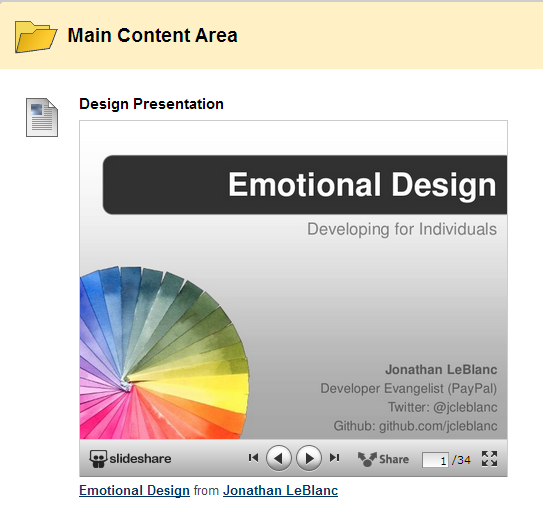
6. Preview the presentation inside Blackboard.

1. Create an item
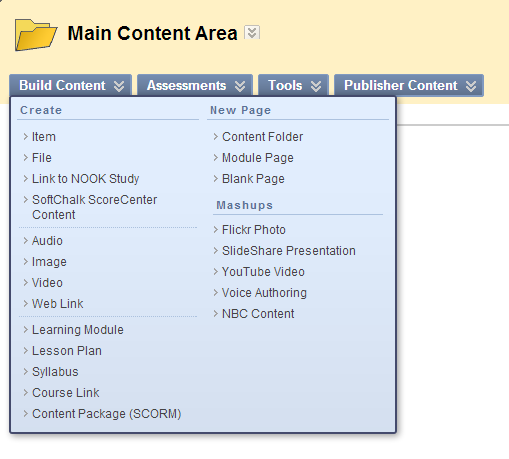
2. Turn on HTML editor

3. Visit Slideshare; find the presentation you would like to use.

4. Click on embed and click copy.

5. Switch back to Blackboard Learn; paste the HTML code into the text field, click Submit.

6. Preview the presentation inside Blackboard.
Thursday, February 21, 2013
Add Banner Image to Your Class
In continuing with the topic of
customization, buttons are not the only thing that can be changed about your
class.
Click on Customization.

1. Click on Teaching Style. It will open a list of options, scroll down to section 6 to upload banner.

2. Click on Browse My Computer to find the image you want to upload. The recommended measurement for a banner is: 1000 px X 200-250 px.

3. Once you find the image, select the image and click open. The file will be attached. You can click Do not attach, if you clicked the wrong file.

4. When you have selected the right file and it has been attached to Blackboard. Scroll down to section 7 and click submit.

5. After clicking submit, you will be taken to the customization tab. It show a message in green saying: "Success: Course Style updated."

6. Go to the homepage to see the new banner that your students will see when they visit your course.
Note: Make sure to use an image that will meet the recommended measurements.

Thursday, February 14, 2013
Customizing Buttons
Change
the color of your course buttons and help students immediately recognize your
course.
The
options for button colors are separated into patterns, striped, and solid
colors. You are also able to select whether the buttons have squared, rounder
corners or round buttons.
1.
Go to Control Panel below the words "Course Management". In the Control
Panel à Customization à Teaching
Style section.
 |
2.
Section
choose color pattern or text/buttons

- When you find a style and color that meets the desired look of your course. Scroll down and click Submit.
- Let us look at the difference:
 |
Thursday, February 7, 2013
Print an Exam using Respondus
If you have a test on Blackboard you would like to administer face to face rather than online, the web browser's print feature is not enough. One alternative is Respondus Campus Wide. Respondus Campus Wide allows you to download the tests as a word document and print it out.
To begin open Respondus Campus Wide (RCW); if you do not have RCW installed and would like to use it. Contact the TTLC: 713-221-8200
1. Once you open Respondus go to Retrieval & Reports Tab. Within the Tab, click on Retrieve Questions.
 2. You should have the Blackboard Server information already filled out. Click Next, depending on your settings you might be asked to fill out your Blackboard Username and Password.

3. Once logged in, in section 1, use the dropdown menu to select the course to retrieve from.
a. In section 2, select whether it is an exam, survey, or pool. In this example, select Exam and use the dropdown menu to choose which exam to download.
b. In section 3, enter a new name for the file.

4. The exam will download and your file saved. Click Ok then Finish.
 5. Now click on the Preview and Publish Tab.
a. Select Print Options
b. Save to File as a Word Document
c. Once it is saved, open the Word Document and print from Microsoft Word.

To begin open Respondus Campus Wide (RCW); if you do not have RCW installed and would like to use it. Contact the TTLC: 713-221-8200
1. Once you open Respondus go to Retrieval & Reports Tab. Within the Tab, click on Retrieve Questions.
3. Once logged in, in section 1, use the dropdown menu to select the course to retrieve from.
a. In section 2, select whether it is an exam, survey, or pool. In this example, select Exam and use the dropdown menu to choose which exam to download.
b. In section 3, enter a new name for the file.
4. The exam will download and your file saved. Click Ok then Finish.
a. Select Print Options
b. Save to File as a Word Document
c. Once it is saved, open the Word Document and print from Microsoft Word.
Thursday, January 31, 2013
Add Speak Command to Word
If you have ever tried proofreading your own writing, you know
that it is almost impossible to catch every mistake. This is mostly because
your brain already knows what you are trying to say. What your eyes read on the
page and what you see in your head are not always the same. Here is a quick way
of preventing most “invisible typos”: Use the Speak command on Microsoft Word. Preventing these typos help
improve both quality and presentation. The Speak Button can also be beneficial
when reviewing what you have written. As the instructor, it can be difficult to
assess if the assignment instructions are confusing. Have the Speak
command read the instructions aloud and decide if they are clear and
concise.
Add the Speak
command to your Word Quick Access Toolbar by following these instructions:
1. Go to File and select "Options".

2. Click on the Quick Access Toolbar. On the dropdown menu select "Commands not in the Ribbon".


The Speak Button will now be available in every document, new or old. Whenever you are done writing, highlight the most recent passage or the entire document and click Speak. The text will be read aloud and you can listen closely and note any typos, grammatical errors, etc.
To get rid of the Speak button, follow steps 1 and 2, click Remove from Quick Access Toolbar and click Ok.
Note: The Speak command is not a replacement for a fresh pair of eyes or a proofreader, but if you want to revise your work before asking someone else it definitely helps.
Subscribe to:
Posts (Atom)