Thursday, May 7, 2015

How to Export and Import Course Packages in 10 steps.

1. Go to the Course that you would like to export to the May or Summer Semester (located in: https://bb2.uhd.edu).

Under the Control Panel, click on Packages and Utilities.

2. The list of options for packages and utilities will include, "Export Package/Archive Course"
Click on Export/Archive Course
3. Click on Export Package inside the Export/Archive Course Dashboard.
4. In "File Attachments" leave the options as default. Unless you are using Softchalk inside of your Course.*

For Course Materials, click on Select All.

5. The process can take a few minutes, but when it is finished you will be able to download a zip file to your computer.
6. Go to the course where you need to place the content. Go to Packages and Utilities and select "Import Package/View Logs"
7. Click on "Import Package" inside of the dashboard.

8. Click on "Browse My Computer" to find the Zip file and attach the file.

 9. Under "Select Course Materials" click on "Select All"
10. Click on the Submit Button at the bottom of the screen.


For additional assistance, you can view our documentation for Exporting and Importing Course Packages

You can also contact us at 713-221-2786 or bb@uhd.edu


*Note: If you are using softchalk in your course, when packaging your course the "File Attachments" should be set to:

Course File Default Directory: Copy links and include copies of the files in the course default directory.

Files Outside of the Course Default Directory: Copy links and include copies of the files outside of the course default directory.

Thursday, February 19, 2015

Blackboard Foundations Course


Blackboard Foundations is designed to give instructors essential skills for teaching online using the tools found within the Blackboard Learning Management System. After completing this course, you should know how basic tools function within the online course environments, and walk away with tips and best practices for making your online course a success.

We are excited that you have chosen to complete this course. Remember this course is offered both online and in person. (Click Here To Find Times and Dates For The Face To Face Sessions)

Recommended Apple and Android Apps

Duolingo (iOS and Android)
This app will help you learn a language on the go. Whether you are waiting for a meeting or on the rail on the way to lunch, spend it leveling up your proficiency in the language of your choice.  You can take quick assessments to skip levels or go through the lessons.

Evernote App Icon
Evernote (iOS and Android)
One of the best note-taking app in both the iOS and Android app store, this app will let you write, record, and capture your notes and store them in the cloud. Use its tag and notebooks system to organize your notes and make them easier to find.

Note: Be sure to check out our class on Evernote by Devin Dabney. 
Evernote Scannable icon

 Evernote Scannable (iOS only)
This app is from the same company as Evernote. It scans and captures images of your papers to save and share. Reduce your paperwork and hassle by keeping a copy of your papers online.

iStudiez Pro App icon
iStudiez Pro (iOS, OSX and Windows)
Voted the Best College Student App of 2011, it lets your students track their schedule, office hours, affiliation, and contact information. It has a special section for keeping track of their assignments and managing their tasks. Your students can track their Grade or GPA based on the assignments and supports weighted or non-weighted assignments, the GPA calculator is available for past and current semesters. Last of all, it will notify your students of pending tasks and upcoming classes and events. If you see a lot of students using their mobile devices, you can recommend this app. It also has a free version called iStudiez Lite


Thursday, February 5, 2015

Using Zoom in the Classroom


What is Zoom?
Zoom is a software tool that unifies cloud video conferencing, simple online meetings, and group chat into one easy-to-use platform.  The University of Houston-Downtown released it to faculty, staff, and students in the fall of 2014


What are some ways I can use Zoom for office hours?
  • You can pre-schedule upcoming office hours sessions - By scheduling an upcoming meeting in Zoom, you can generate a link that can be shared with students to virtually join you at the appropriate time.
  • You can meet with individual students about assignments or tests - If you would like to meet with a student form the comfort of your office or home, you can start a meeting and invite the student to join your directly from Zoom.
  • You can meet with groups to discuss projects - Because Zoom has functionality to allow up to 25 people to join a virtual meeting, you can also meet with groups who may have a desire to discuss a project, presentation, or assignment.

What are the benefits?
  • Zoom is provided, free of charge, for all faculty, staff, and students.
  • Zoom is very easy to install and use
  • Zoom allows for recording meetings
  • Zoom allows for screen share for the host and participants
  • Zoom can be used even if a user does not have a webcam or the ability to show video
  • Zoom is simple enough, yet robust enough to help you accomplish most of your desired meeting tasks 


How do I get Zoom?

Zoom can be downloaded from the UHD portal at http://uhd.zoom.us.  For a quick video on signing into Zoom visit https://uhdhml.uhd.edu/Play/181

If you are interested in further training on Zoom, please check our training page for upcoming dates or simply contact someone in the TTLC to schedule a one-on-one session.


Thursday, January 29, 2015

Adding Students to Already-Made Groups


Students that added late to a class will not automatically be placed into Blackboard groups that were created before the student was enrolled.  This is true no matter how the group was set up; if the instructor set Blackboard to randomly assign students to groups, the membership is set once the groups are created -- students subsequently coming in to the course will not be automatically put into groups.
 
Fortunately, Blackboard makes it easy to see who is not in a group and assign them to groups as needed.
 
 
1. Go to the Groups area of the Control Panel.
 

2. On the top right, switch to All Users view.


    3. All students will be listed, and what group if any they belong to.  Mouse over a student’s name to bring up the Add to Group function.


    4. Click Add to Group and use the drop menu to select from available groups.


    The student is now in the specified group. 


    Thursday, October 2, 2014

    NEW Access Log for Tests

    Instructors can view a test attempt's Access Log for a list of times of various student interactions with the test. The log can help to confirm whether a student began a test or ran into problems during a test.

    The Access Log shows a detailed list of every interaction a student had with the test for that attempt. The log shows the time the test was started, when each question was saved, and when it was submitted.
    An unusual gap in activity might be
    interpreted as a connectivity problem if the student claims to have had one. However, the system cannot determine what caused the time gap—it can only show that it occurred. 

    Be aware that the time spent on a  question may include time that the student spent looking at other questions before saving that answer.


    Visit the TTLC Training page for step-by-step instructions for retrieving info from the access log:
    Determining Test Interaction Using the Access Log

    Thursday, September 11, 2014

    Understanding Tests Results and Feedback


    The way that instructors release test results and feedback has changed with the latest update.  Here are some tips to help understand how it works now.

    Start by going to Edit Test Options.

    In the Show Test Results and Feedback to Students area, there are two rows of options available.  The top row is the main condition for releasing results and feedback, and the bottom row is an optional sub-condition, which has different options depending on what was selected for the main condition.

    By default the settings are as pictured below.
     

    The main condition is set to release the score for each question immediately after the student submits the test.  There is no sub-condition, as no conditions are selected in the second row.

    Other options are available in the When drop menu, including After Due Date, etc.  There is no option, though, to not show students anything.  If you select --Choose--, it is the same as if After Submission is selected, students will immediately see their results.  If you do not want students to see the test score, you need to hide the column from students in the grade center.
     
    If you just want students to only see their score but not see which questions they got right or wrong, you need to select the appropriate option from the When drop menu (your choice) but then leave all of the other options alone.  If you do not check any other boxes, students will only be able to see their score and will not have access to their test attempt.
     
    If the Score per Question box is checked, students see the questions from their attempt and the number of points they received (if any) per question.  
     
    The Answers area offers many different options.  If Submitted is the only box checked, students will only see the answers they selected, with no others listed.  If Correct is the only box selected, then students just see the correct answers.  If both Correct and Submitted are checked, students see both but not any of the other possible answers.  If All Answers are selected, students can see all available answers, but they still need Correct and Submitted checked to see which is the correct answer and which was the one selected, respectively.  So you can mix and match these options to your liking.
     
    Feedback will be shown if checked.  When you create a test question, or edit an existing one, there is an area to provide correct and incorrect feedback.

    The Show Incorrect Questions places an icon with a red X next to questions that were answered incorrectly.
     
    You can use Student Preview to check how the test appears in My Grades.  Just remember to set it so that the Student Preview data is saved when you leave the preview.
     
    As always, call us or email if you need help: 713-221-2786, bb@uhd.edu.

    Thursday, August 28, 2014

    New Features in Bb this Fall!

    Some features have been updated in Blackboard over the summer. Check the out some of the best time savers below!

    Date Management 

    Use the date management tool to easily adjust all content and tool dates in your course. Accessed on the Control Panel in the Course Tools section, you can choose to adjust dates automatically or individually from one convenient location.


    Link: https://www.youtube.com/watch?v=p6iEAgz0rUI

    Assignments 

    Assignments ready to be graded can be found in the Full Grade Center.
    One of blackboard’s new features is inline grading, which replaces the old grading process.


    Link: http://www.uhd.edu/computing/ttlc/training/documents/Blackboard/SP15/Faculty/Assignments_Grading.pdf

    Testing 

    Test Availability exceptions area allows exceptions to be made to the existing test from the test options menu. Use exceptions to provide an accommodation to a student who is disabled, or for technology and language differences.

    Link: http://www.uhd.edu/computing/ttlc/training/documents/Blackboard/SP15/Faculty/Tests_Creating.pdf


    If you have any questions or comments regarding the steps outlined in this document, please contact UHD Blackboard Support by calling (713) 221-2786, or by sending an email to bb@uhd.edu

    Thursday, May 22, 2014

    Blackboard Mobile is available this summer!

    If you're using the Blackboard Mobile app remember Summer courses are on Bb2 https://bb2.uhd.edu/


    To find Bb2 on the mobile app search the app for 'University of Houston -Downtown May and Summer Courses'.  Then proceed to login as usual.


    Thursday, April 10, 2014

    Adding Multiple Files at the Same Time using Items


    Adding Multiple Files at the Same Time using Items
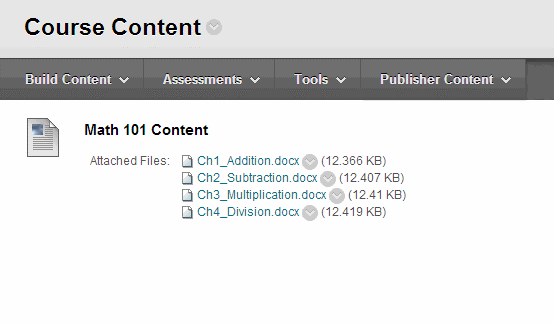
    Use this method to simultaneously add multiple files, without having to create each link one-by-one. All files will be associated with one Item, as shown below.
    finished.gif
    First Step: Add Files to Content Collection
    Files must first be placed in the Content Collection before they can collectively be added to an Item. The easiest way to upload several files to the Content Collection is to first package them – the WinZip program is available on campus and can be used to package files. With WinZip, you can select several files, right-click, and then select WinZip > Add to Zip File, and then all of the selected files will then be packaged into one file.
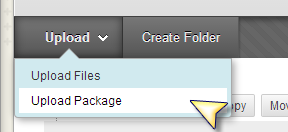
    Use the Upload Package option to bring the files to the Content Collection.
    up_pckge.png
    Second Step: Creating the Item and Adding the Files
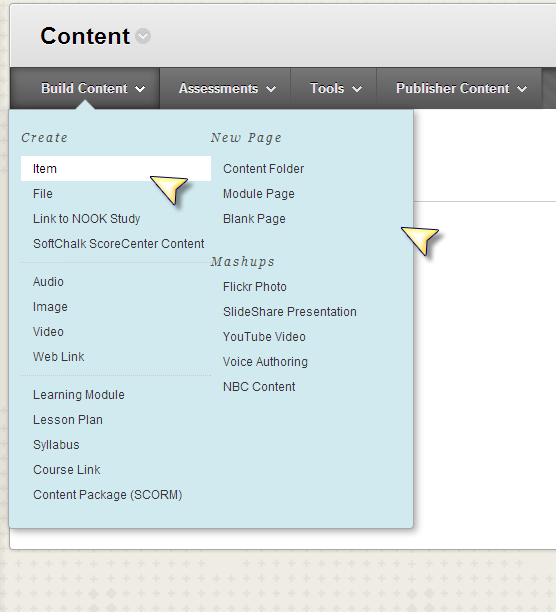
    From any content area, click Build Content and select Item from the list.
    item.png
    An Item allows for multiple attachments to be simultaneously added, but the attached files must come from Content Collection. You cannot select multiple files if you attach files from your local computer.
    In Section 2 “Attachments” click the Browse Content Collection button. 
     attach.png
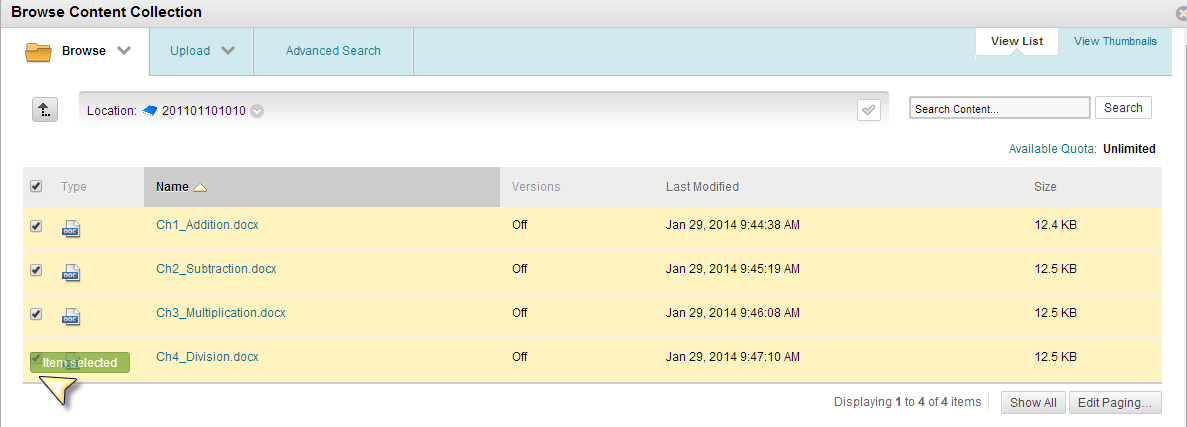
    Use the checkboxes to select multiple files. Click Submit afterwards.
    multiple.png
    The attachments will all be listed. Click Submit again to create the item. Blackboard automatically arranges the files, alphabetically by title, however if you edit an existing item and add more files, the additional files will always appear after the first set of files.
    finished.gif

    Thursday, March 13, 2014

    Important information if you’re using Respondus…


    If you’re using Respondus and you edit your test options you will need to reset your Respondus settings.
    You can do that with the following steps:

    1.  After you have edited your test options go to course tools, Respondus Lockdown Browser.

    test options 2.jpgrespondus from tools.jpg


    NOTE: Respondus automatically generates a password you will see if you edit the test settings.  Clearing that out will also cause the Respondus settings to need to be reset.
    2.  From that window if your settings need to be reset it will display Error with a “Fix it” button
    respondus fix it.jpg
    3.   Select Fix it.  After the fix is complete it will display “Required”
    respondus fixed.jpg

    That Didn’t work?

    If the error is still displayed after the “Fix It” button has been selected you need to modify the settings.
    1.   Select the drop down menu next to the name of the test and select modify settings


     respondus edit settings.jpg
    2.   Select “Don't require Respondus LockDown Browser for this exam” and “Don't require Respondus Monitor for this exam”.  Then select Save and Submit.


     turn off respondus monitor.jpg
    3.   Then add the original Respondus settings to the test again.

    Thursday, February 6, 2014

    Bb Collaborate has some NEW features

    Create a Collaborate Session


    Blackboard Collaborate allows the creation of virtual classrooms in which students can participate. Collaborate allows users to communicate via voice, video, text, and desktop sharing. It provides an environment for online learning, meetings, training, and on-demand presentations.

    1. Login to Blackboard and enter the course in which you would like to add a Collaborate session.
    2. Enter or create the Content Area that will display your Collaborate Session.
    3. Once inside of your Content Area, click Tools and then select Blackboard Collaborate from the  drop 


    4. In the Bb Collaborate List Page, click Create Session.

    a. The name of the session is the name of the course by default. The session name can be changed as needed.

    b. Change the start and end times for this session.

    c. Select the repeat off button to have the session repeat throughout the semester. Repeated
    sessions will use the same start and end time as the first created session, but will create additional
    sessions for other dates based on the options you select.

    d. Change the early session entry to allow users into the session before the desired start time and
    date.


    5. Scroll below the Session Information to change the Room Options: Session Type, Teleconference Options, Room Attributes, Grade Center Integration, and Assign Roles. 


    Course: All users registered in this course can attend the session. 
    Shared:  All users registered in courses that you teach can attend this session.


    Use Built In:  The system generates the teleconference number, code, and PIN for participants and moderators.
    Use third party:
    To use another method, provide the information.
    Do not use teleconference:
    Use VoIP. Users are able to hear the session through their computer speakers or USB headset.


    Recording Mode: Controls the recording for the session.  Can be Manual, automatic, or disabled.
    Max Simultaneous Talkers: Maximum number of simultaneous talkers allowed at the start of the session
    Max Cameras: Maximum number of simultaneous web cameras allowed at the start of the session
    View Private Messages: Allows moderators to view all private chat messages in the session.
    All Permissions:  All participants have full permissions access to session resources such as audio, whiteboard, and so on
    Raise Hand on Entry: Users automatically raise their hands when they join the session
    Allow In-Session Invitations: While in a session, moderators can invite users to join
    Hide Names in Recordings: Names of participants are hidden when viewing recordings
    Preload Content: Upload a file to use in the session


    Add a grade column: Once the session ends, you can pull an Attendance Report which will allow you to push the points to the Grade Center


    All users join as participants: All users will join the session as a participant
    All users join as moderators: All users will join the session as a moderator giving them access to every functionality in the session.
    Assign access: Restrict who can join this session as a moderator or a participant.

    6.    Once you have made all of your room options select save.