Thursday, April 19, 2012

Could not login. Valid authentication credentials were not provided.

Does Blackboard refuse to accept your username/password no matter how many times you've entered it?   Do you keep receiving the message "Could not login.  Valid authentication credentials were not provided" when trying to access your courses?


 The problem could be an expired password.


UHD Passwords expire after 90 days. 
Students who suspect they have an expired password can change their password by clicking on the "Forgot Password" link on the UHD Blackboard login page (see below).  The "Forgot Password" link will take you to the UHD Student Password Manager page.


*UHD Blackboard Support recommends waiting 5-10 minutes after changing your password before attempting a Blackboard login.

For password help, UHD Students should contact UHD Student Technology Services at 713-221-8540 or the UHD Help Desk at 713-221-8031.


Wednesday, April 18, 2012

“This Test can be saved and resumed later” … what does it mean?

This statement is related to Force Completion.  Force Completion is a test option instructors can set that only allows for a one-time entry into a test. If a test has Force Completion enabled and a student accidentally closes the browser, or loses connection to the test, the student cannot reenter the test unless the instructor intervenes.

Students:  Force Completion DOES NOT affect the test timer.  The test timer starts counting down as soon as the Begin button is clicked.  Exiting a browser session during the middle of a test does not stop the test timer.
Reminder: UHD IT Training materials for Students are available at http://www.uhd.edu/computing/ttlc/training/#fragment-3

Faculty: UHD Blackboard Support does not recommend the use of Force Completion due to the many variables that can interrupt a test session.  If you have any questions, please contact UHD Blackboard Support at 713-221-2786 or bb@uhd.edu
Reminder: UHD IT Training materials for Faculty/Staff are available at http://www.uhd.edu/computing/ttlc/training/#fragment-2

Test Instructions (student view) with Force Completion turned ON:


 Test Instructions (student view) with Force Completion turned OFF:


Friday, March 23, 2012

Removing courses from your Blackboard Course List

Need to clear away old or unused courses from your Blackboard course list? Blackboard has two areas where courses appear - the Course List Module from within the My Courses tab and the My Courses Module from within the My Blackboard tab. To hide courses you no longer need in each of these areas, follow these easy steps:

Hiding courses in the My Courses tab:
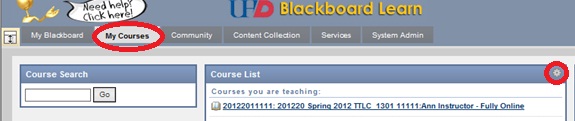
  1. Navigate to the My Courses tab. 
  2. From within the Course List area, click the link to Manage Course List Module Settings (small gear icon in the upper right) of the Course List module.


  3. Uncheck the items beside the course(s) you wish to remove from your course list.


  4. Click Submit to apply your grading changes to the module.

Hiding courses in the My Blackboard tab:
  1. Navigate to the My Blackboard tab. 
  2. From within the My Courses module, click the link to Manage My Courses Module Settings (small gear icon in the upper right).


  3. Uncheck the items beside the course(s) you wish to remove from your course list.


  4. Click Submit to apply your grading changes to the module.


Reordering modules in the My Blackboard tab

Modules on the My Blackboard page can be arranged in an order of your choosing.  To arrange your modules you can: click and drag the modules or use the Reorder Modules link in the upper right.

To use the “click and drag” method:
  1. Hover your mouse pointer over the title bar of the module you would like to move.

  2. When your pointer turns into crossed arrows, left click and hold.


  3. Drag your module to the location in which you would like for it to appear (dashed lines denote where the module will be placed) and let go of your mouse click. Your ordering changes should be permanent until you once again edit your modules.


  4. Please note that the module column locations allow for different module window sizes. The location of the module can affect the visibility of module content.
To use the Reorder Modules link:
  1. Click the Reorder Modules link (double arrow icon) in the upper right of the My Blackboard page.


  2. Select a module and use the arrows to move it between columns.


  3. Once you have decided your module order, click the Submit button to apply your changes.

Downloading discussion threads

Instructors that would like to gather their discussion threads into a document that can be easily viewed have the ability to do so. To download discussion threads:
  1. Go into a forum containing threads.


  2. Use the top check box to select all the forum threads. Next, click on the Collect button.


  3. From within the collection area you will see the posts are organized in an easily readable format.  Click the Print Preview button at the top. 


  4. Print Preview allows you to

    • Print your collected posts to a connected printer.
    • Save the file as an HTML file that can be saved to your local computer (different browsers have different options for this).
    • If installed you can turn the collection into a PDF file that can be saved to your local computer.


Making a discussion forum gradable

Want to grade a discussion after a set number of posts? Follow these easy steps:
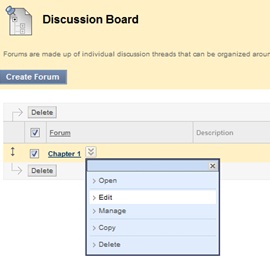
  1. Navigate to the forum you wish to make gradable and click the drop-down to the right of the forum name.  Select Edit from the drop down menu.


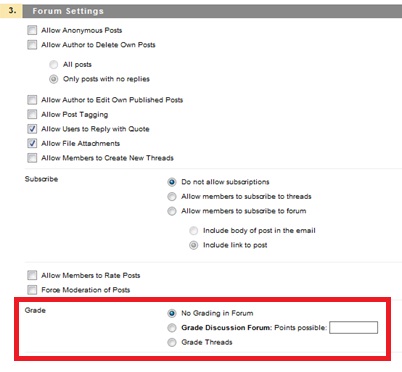
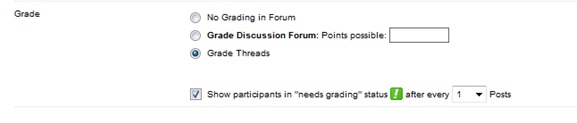
  2. In Section 3, Forum Settings you have the option to grade the forum as a whole or grade the individual threads in the Grade area.
    • To grade the forum as a whole, select the radio button beside Grade Discussion Forum. 
    • To grade the individual threads, select the radio button beside Grade Threads.


  3. Both grading options allow you the option to determine how many posts will exist before the Needs Grading icon will appear in your grade center. To make this determination, click the check box beside “Show participants in “needs grading” status”. Then select from the drop down menu the number of posts you will require before the needs grading status will appear.


  4. Click Submit to apply your grading changes to the forum.

Editing the appearance of the My Blackboard tab

Tired of the plain, old look and feel of your My Blackboard tab?  You are in luck!  Blackboard allows you to edit the color scheme of this page.  To do this you will need to:
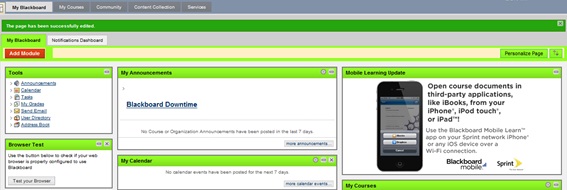
  1. Login to Blackboard and navigate to the My Blackboard tab.
  2. Click the Personalize Page button in the upper right.


  3. Select a theme from the Color Palette Library.  The Current Selection area gives you a sample view of the theme you have selected.


  4. Once you have decided on a theme, click the Submit button.


  5. Your My Blackboard area should now reflect your changes.


Thursday, March 22, 2012

Message Replies and Attachments

When replying to a message, you do not have a button for adding an attachment.  The best option to reply to a message with an attachment is to copy/paste the original message into a new message.

To copy/paste the original message into a new message:
1. Open your message by clicking on the message subject in the Messages tool inbox.


2. Highlight your message text and select Copy, then click OK.


3. Click on the Create Message button.


4. Select your recipients, add a subject, and paste your message into the message body. 5. Scroll to the top of your message body and put your cursor above the original message.  Hit the enter button to bring down the original message. 


6. Type your message reply in the message body above the original message.

7. Add an attachment using the Upload Attachment area in Section 3. Click submit to send your message.


For more information about using the Blackboard Messages tool please visit:
http://www.uhd.edu/computing/ttlc/training/documents/bblearn/Messages.pdf

Need a custom Grade Center view? Use Smart Views!

Untitled Document

Smart Views allow instructors to view their Grade Center using predefined filters.  All courses automatically have two Smart Views already: Assignments and Tests. 


Additional Smart Views can be built that quickly provide needed information to instructors.
Besides Assignments and Tests, there are several other prebuilt Smart Views readily available that can also be added to the Control Panel for easy access.  To view the Smart Views, mouse over Manage and click the Smart View link.
To make a permanent link in the Control Panel for a particular Smart View, click the star in the Add as Favorite column to turn it green.  If students have graded Discussions posts, then Discussion Boards can be selected in order to only show those scores.  Another available Smart View is Preview of My Grades, which will only show the columns visible to students in My Grades.

To access smart views, go to the Full Grade Center.  Inside the Full Grade Center, click the Manage button at the top and select Smart Views from the drop down list.


In the Smart Views window, Smart Views deployed in the course have a green star in the "Add as Favorite" column.  Smart Views that are available but have not been deployed have a grey star.


Creating a Custom Smart View
Smart Views can also be customized to show the data that you specify.  For this example, a Smart View will be built to identify the students that we classify as “struggling” based on their grades in specific columns.
  1. Click Create Smart View.  Name the Smart View “Struggling.”  A description can be provided if desired.  Click the Add as Favorite checkbox.
  2. Change the Type of View to Custom.

    The students that need to be identified have scored less than 70 on both Quiz 1 and the Midterm.  In the Select Criteria area, one criteria requirement is provided already, which can be used for Quiz 1.  Use the Add User Criteria to add another requirement for Midterm.


  3. Since both criteria need to be true, there is no need to change the formula from “1 AND 2” so do not click Manually Edit.  Filter Results can be used to show additional columns; for this example keep the default Columns Used in Criteria.      
        
  4. Click Submit.
Results for “Struggling” will look like this:


Monday, March 5, 2012

Paste from Word Feature

The new “Paste from Word” feature in Blackboard’s text editor reduces browser compatibility issues.

1.    Copy the text in Word that you wish to transfer into Blackboard.

2.    From the text editor’s formatting toolbars, click the mashup icon, which will produce a drop-down menu.

3.    From the menu, select Paste from Word.
Click image to enlarge


4.    A dialog box will pop up. Place your cursor in the large text box, right-click, and from the drop-down menu choose Paste.
Click image to enlarge

5.    Click Submit.

6.    Your Word text will appear in the text box. You may edit as you wish, and click Submit on your changes when you are finished.

Provide Mail in Main Menu (and Other Tools)

The “Messages” tool is used to communicate internally within a Blackboard course.  You can add this tool, and others, in the main menu by following these steps:

1. Inside your course, make sure edit mode is ON.

2. Click the blue plus at the top left, and select Create Tool Link.
Click image to enlarge

3. Type the name of the tool you wish to be displayed to the students in the left menu. For example, “Course Email.”

4. From the drop-down menu, select Messages.
Click image to enlarge

5. Place a checkmark beside Available to Users.

6. Click Submit.

Now you should have a main menu link to the messages tool.

Follow the same steps for any other tool you wish to add to the main menu, including common tools such as:
- Student Grades
- Announcements
- Calendar

New! Getting Alerts for Messages

The new My Messages module displays the number of unread messages that a user has for a course, and lets users jump directly to the Messages tool in that course.  This allows messages to quickly be checked without having to navigate to the messages tool in the course. The module is available to both students and instructors.

Instructors must place it inside their course in order for students to be able to see and use the tool.

1. To add the My Messages module, first go to any module page that displays the Add Module button at the top left.  (By default, Blackboard makes the "Home Page" a module page.)

2. Click the Add Module button.
Click image to enlarge
 
3. Scroll down to locate the My Messages tool and click the Add button to add the module.
Click image to enlarge
 
4. Scroll down and click the OK button at bottom right. The My Messages module box will appear in your module page. You will see only unread messages from this particular course.


Good to Know 
Users may also place the My Messages module on the My Institution page, which will display all unread messages from all the courses in which one is enrolled or instructing.


Set Grades as Running Totals

Making any calculated column set as "running total" will give students a more accurate grade because it includes only the assignments/quizzes that have been graded. If you were not to have this Running Total column available, the final grade column will calculate zeroes for columns that have not yet been graded. This can make grades appear artificially low.

In the Grade Center, you can create Calculated Columns, which can be used to do the following:

  • Calculate the total points of other columns.
  • Weight grades by column, category, or both.
  • Calculate the average grade.
  • Calculate a minimum or maximum grade.

Make a Calculated Column Set as a Running Total
1. At the bottom left in the control panel, click Grade Center and select Full Grade Center.

2. Either create a new calculated column by clicking the Create Calculated Column button, or click the drop-down arrow of an already present calculated column and select Edit Column Information.

3. Scroll down to the Select Columns section, and select the Yes radio button next to Calculate as Running Total.
Click image to enlarge


5. Scroll down and click the Submit button.


Friday, February 17, 2012

Assignments/Tests - Students Not Getting Feedback?

If your students do not seem to be getting their feedback text or attachments, it may be because the faculty member placed the feedback/attachments in the "Grading Notes" area of the assignment or test. The comments and attachments added in this area are meant to be visible only by the instructor.

Follow these when returning feedback/attachments to a student's assignment or test submission:


1. Enter the course and go to the Full Grade Center.

2. Find the column of the assignment/test you wish to grade, and click the drop-down arrow at the very top of the column. Select Grade Attempts.

3. Once you are taken to the Assignment or Test area, scroll down.

Click Image to Enlarge

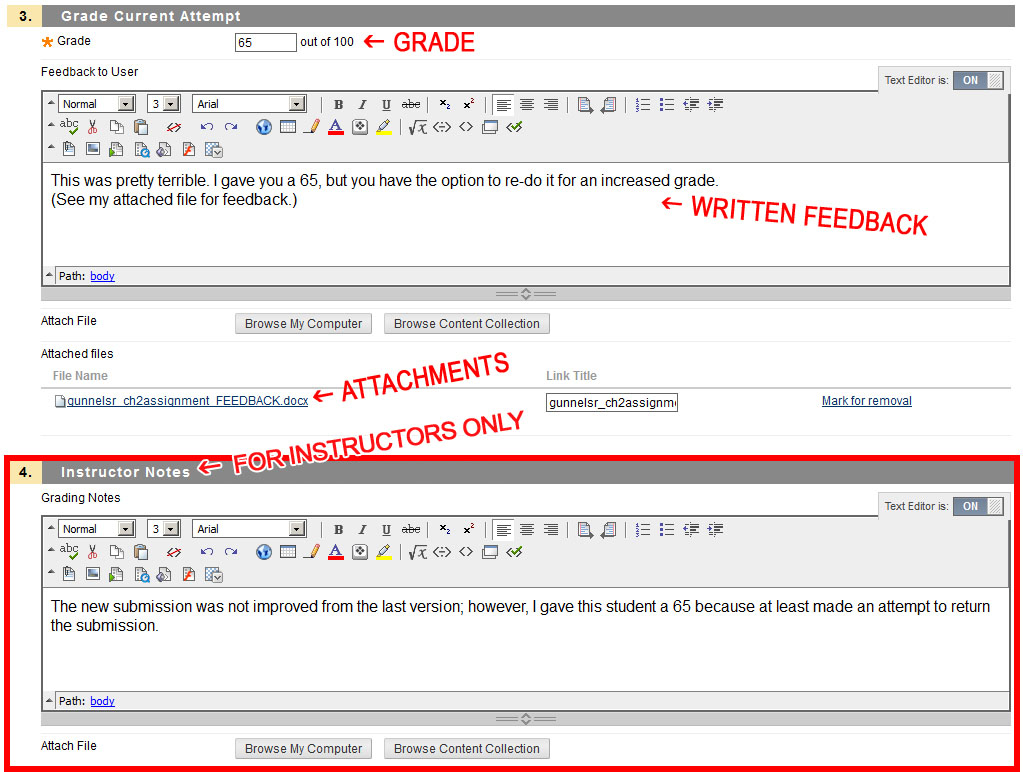
4. In scrolling down, you will find three sections:
       a. Grade - how many points a student achieved on the submission
       b. Feedback to User - text and attachments that students will be able to see
       c. Grading Notes - text and attachments meant ONLY for instructors to see

Students will only see your feedback and attachments if it is in the Feedback to User area.

Click image to enlarge


Please feel free to call UHD Blackboard Support at (713) 221-2786 if you have any questions about feedback or editing assignment/test attempts.


Friday, February 10, 2012

Announcement to Students

Dear Students,

If you are required to use Respondus Lockdown Browser for exams, we recommend that you uninstall any previously installed version and reinstall the latest version from the following link:


If you have questions or problems please contact user support at (713) 221-8031.

Regards,
Blackboard Support

Applying a Rubric to a Graded Discussion

Rubrics allow you to apply specific grading criteria on your students' work and provide detailed explanations regarding your grading decisions.  A rubric can be applied to an assignment, test or a discussion topic.  One would apply a rubric to a discussion forum so the threads can be easily graded. 

To apply an already-created rubric and apply it to a discussion forum, follow these steps: 

1. Go to the discussion board to which you wish to apply the rubric, and click its drop-down arrow. Select Edit.  

2. Scroll down to Section 3, Grade Settings.  Make the forum graded by selecting the radio button next to Grade Discussion Forum and choose the amount of points possible. 

3. When you click the aforementioned radio button, the Rubrics options will appear. Hover your mouse over the Add Rubric button to select an existing rubric or create a new one on the spot. 
 

4. The Grade Threads option also allows rubrics to be used, but the rubric must be applied via the Grade Center discussion column for the graded thread.  
           a. To choose this option, go to the Grade Center. 
           b. Find the column of the discussion and click its drop-down arrow.
           c. Select Edit Column Information add a rubric to the graded thread.
           d. Scroll down to where it says "Points Possible" and click the Add Rubric button.
          
           e. Click Select Rubric, choose the correct rubric and Submit.


Click here to watch a video about how to create a rubric.

If you have any questions,
contact Blackboard Support
at 713-221-2786.


Wednesday, February 8, 2012

Need to Know a Student’s Last Login?

There are many instances during which it is very useful to know when a student last logged into your course. Use Blackboard’s Early Warning System to determine this by following these steps:

1.    Enter your course. Make sure edit mode is turned ON.

2.    Scroll down to the control panel at bottom left; click Evaluation and select Early Warning System.


3.    On the Early Warning System page, click the Create Rule button, and select Last Access Rule.

4.    Name the rule “Attendance Rule” (or something of your choice).

5.    In the text field provided, decide at what amount of days you wish the rule to alert you of a student’s last access. For instance, entering “14” in the field will create a rule that checks to see which students haven’t logged in within the last 14 days.

Click Image to Enlarge


6.    Click the Submit button.

7.    On the Early Warning System page, you will see your new rule listed. To “activate” the rule, click its drop-down arrow, and select Refresh. Click OK on the dialog box that pops up.

8.    Now in the Number of Warnings column, you will see how many students were flagged by this rule.

9.    To view the flagged information, click its drop-down arrow and choose Review Rule Status.


10.    You will be taken to an area that displays last access information.

Click Image to Enlarge


Please note: the Early Warning System does not continuously monitor the course and must be refreshed on a regular basis by the instructor. To refresh the rule, complete step 7 above.

If you have any questions,
contact Blackboard Support
at 713-221-2786.